
With a pencil and paper it's very easy to add or take away whatever lines you want. Your imagination is the limit. But on a computer, you have to work with what you've got. That's why it's important to start with strong elements that will help you graphically (i.e. images/text with simple and clean lines...these will be the easiest to make into vector art for your logo).
If you remember, I'm starting from this sketch:

{Note: I'm just showing you how I created my design. There may be several ways to achieve the same results. Additionally, I'm simplifying the process because I created drafts of the logo and went back over it several times to modify the parts I didn't like or that didn't look great on the web...I'm just showing how to get to the final result.}
I decided to begin with making the arrow that acts as the "S" in Roads. I looked for a picture of a road sign with a similar arrow. I found one on the internet through a basic search (it definitely didn't have to be from the internet, but it's the easiest way to go.) Please be aware of copyright if you plan to copy any pictures from the internet. If you copy anything, make sure you are only using it to create a unique image of your own.
Designer sidenote: It's frustrating when people ask you to just copy something from the internet or make it look exactly like someone else's work. That's called stealing. Wouldn't you be mad if someone stole something you worked hard on and tried to pass it off as their own?
Anywaaaay...............
Once I found a picture I wanted, I copied it to my desktop and placed it into a new document in Adobe Illustrator. The document type doesn't really matter, I just used what was default for me (8.5x11 print).
{You'll have to excuse me as I'm still using CS3 on my personal computer (it works just fine for my needs!).}

When I placed my image into the document it was a little larger than I needed so I used the Selection Tool (black arrow) and held down the Shift key while dragging one of the white boxes in the corner of the image to resize it. It's very important to hold the shift key so that you don't stretch the original image. I see this is a very common problem for amateurs, and it makes for a very sad image.
Next, I clicked the Live Trace button in the toolbar at the top. This is my favorite feature in AI. It's magical. Essentially it turns an image from raster to vector. You want your logo to be in vector format because it's very crisp (it uses points vs. pixels) and can be easily scaled to any size without losing quality. There are different settings you can manipulate when using Live Trace, but because I picked a picture that was fairly graphic in the first place, I didn't have to change anything. Easy. To exit the Live Trace feature, I clicked Expand.
From there I right-clicked and ungrouped the pieces. I deleted all the elements except the arrow that I wanted to use. Then I created two text boxes with the Type Tool (the T). In one box I wrote "ON GOOD," and in the other, "ROADS." I did this so that it would be easy to move the two lines of type around freely. Once I had the blog name written out, I picked a font that I thought went well with the image I wanted to convey. I decided on a simple san serif that looks much like the type you would find on a road sign. I adjusted the kerning and tracking in some places to look better.
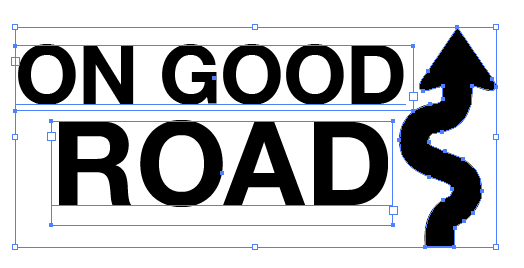
So here's where my logo was after all that work. My husband suggested making the arrow look more like the letter "S," and I agreed. To do that I had to use the Direct Selection Tool (white arrow). I moved the individual points at the bottom of the arrow to curve around a little more to the left. I also added an additional point with the Pen Tool to achieve that look.
Once I had everything arranged and looking nice I saved my file as a .ai (in case I have to go back and change anything in the original file) and as an .eps (this is one of several ways to save a vector image, and it's a file that I could import into Photoshop for the rest of my logo work).
I will have to explain the colored portion of the logo in a Part 3. Stay tuned.
No comments:
Post a Comment